Even though only 11 years old, Node.js has emerged to be one of the most popular web development frameworks in the last decade. I’m a big Javascript fanboy, and thanks to Node.js, I can write Javascript code outside the browser to create server-side web applications that are non-blocking, lightweight, fast, robust and scalable.
In this post, I want to talk about two aspects of programming in Node.js - about the internal mechanics of the framework and about the best development practices for creating efficient and sustainable Node.js applications.
By consciously making the effort to understand the inner workings of a framework, we open ourselves to insights about the ways and means of not only the framework itself, but also about prevalent programming paradigms and their design decisions. Over time, these lower-level insights and knowledge reflect in the way we write code and drive our understanding of how we can optimize our applications for speed and performance. An integral aspect of how Node.js works under the hood is it’s single threaded, event loop based apparatus for achieving asynchronous behaviour. We will explore this in greater depth in the first half of this post.
The second half of this post will be dedicated to the other end of the spectrum - highlighting 12 best practices to keep in mind when starting with a new Node.js project. These constitute the various facets of creating a robust application in terms of the overall architecture, the folder structure, modularity, writing clean code, managing dependencies and so much more. In some way, this will be an extrapolation of our understanding of the building blocks of Node.js to establish certain ground rules and guidelines for creating a rock solid foundation for our projects.
Through this post, I wish to answer the following questions -
- How does Node.js work under the hood?
- How is concurrency achieved?
- How does it compare with other multi-threaded web frameworks?
- What does a good Node.js project setup look like?
- What are the most important practices to keep in mind when setting up a Node.js application?
Use the links below to navigate or skip ahead in the tutorial:
Let’s get started!
A Brief History of Node.js 📜
Just to give you a sense of the timeline here, the World Wide Web started around 30 years back. Javascript was born about 25 years ago and about the same goes for PHP (26 years). Node.js, on the other hand, is only 11 years old. Despite its relatively short run, Node.js has done wonders for developer organizations around the world.

Ever since Javascript has launched, there have been attempts to utilize Javascript for the back-end, for example, Netscape tried to do something similar with Netscape Livewire. These however turned out to be unsuccessful. Around 2004 onwards, when the first waves of Web 2.0 were starting out, Javascript started getting a lot of traction owing to the visions of a modern web experience. Since Javascript was (and is) the most widely used client-side programming language, browsers competed and pushed to create the most optimized Javascript engines for best performance. One of these engines was Chrome V8, on top of which Node.js was later built. As a result of this momentum, Javascript flourished, and so did the V8 engine.
In 2009, in the right place, at the right time, Node.js was born. Ever since then, Node.js development has skyrocketed. Despite competition from pioneers like PHP and Advance Java, Node.js has emerged to be the more preferred server-side choice for many applications today, thanks to it’s asynchronous I/O, event-driven architecture, light-weightedness, speed, scalability and the fact that it uses the most popular programming language i.e. Javascript. Today, Node.js servers are used in production for applications and enterprises that cater to hundreds of millions of users worldwide - Netflix, Linkedin, Microsoft, GoDaddy, Paypal and many more. To give you an estimate of it’s popularity, Node’s package manager, NPM, registers billions of downloads each week.
Node.js is very actively maintained, thanks to its enormous community of users and developers. This means that there’s abundant support on the internet if you get stuck somewhere and need some help with your code, or any web development advice in general.
Now let us look at what gives Node.js its edge - how it works under the hood.
Background: A Primer on How Node.js Works ⚙️
Node.js is most popular for it’s asynchronous event-driven, non-blocking I/O processing. It gets most of this concurrency and asynchronism from Javascript’s single-threaded event loop model.
Most other web development alternatives like ASP.NET, JSP, Spring use a multi-threaded processing architecture to cater to concurrent client requests. Let’s take a closer look at these multi-threaded models before we contrast them against what Node.js brings to the table.
Traditional Multi-Threaded Processing Model in Web Frameworks ♨️
In multi-threaded processing setups, each server has a limited thread pool at it’s disposal. Every time the server receives a request from the client, it picks a thread from the pool and assigns it to the client’s request. This thread will take care of all the processing related to that request. Inside these threads, the processing is sequential and synchronous in nature i.e. one operation is performed at a time. Regardless, when a new concurrent request is made to the server, it can pick up any available thread from the pool and put it on duty.
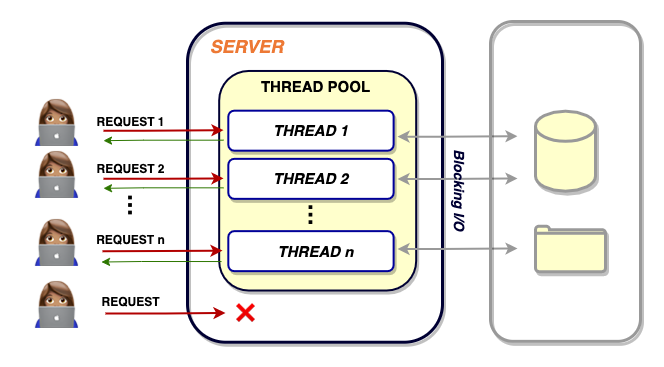
This can go on and on until all your threads are exhausted. When that happens, your server is forced to wait for at least one of the busy threads to be freed for the new request(s) to be catered to. If not responsibly accounted for, this can turn out to be slow and inefficient for your application. Besides, the synchronous nature of processing inside each thread means that even though we can spin up multiple threads for concurrent requests, each thread, individually, will be slowed down when encountered by blocking code. Such multi-threaded support also brings forth the difficulties of dealing with synchronizing and managing multiple threads. There’s also a risk of dead-locking, wherein multiple threads are blocked forever in the process of waiting for each other to free up resources.
Now let us look at how Node.js handles concurrency.
Single-Threaded Event Loop Architecture in Node.js 🔄
There’s a lot of confusion about whether Node.js really does everything with just one thread. How could that be possible? How could it compete against other multi-threaded frameworks with just one thread?
As we know, Node.js is essentially a Javascript runtime built on top of Chrome’s V8 Javascript engine. This means that it is based on Javascript’s single-threaded architecture. Therefore, every time there’s a client request, it is handled by a single main thread. The event loop is the primary component that allows Node.js to run (otherwise) blocking I/O operations in a non-blocking way. It constantly keeps track of the status of your asynchronous tasks (eg. the code in your callback functions) and moves them back to the execution queue when they’re completed. It operates in the same main thread we have been talking about.
The interesting thing to note here is that even though there’s just one main thread on the surface, there are a bunch of auxiliary threads in the system kernel that Node.js can utilize for extensive disk and network-based async operations. This group of threads constitutes (what is known as) the worker pool.
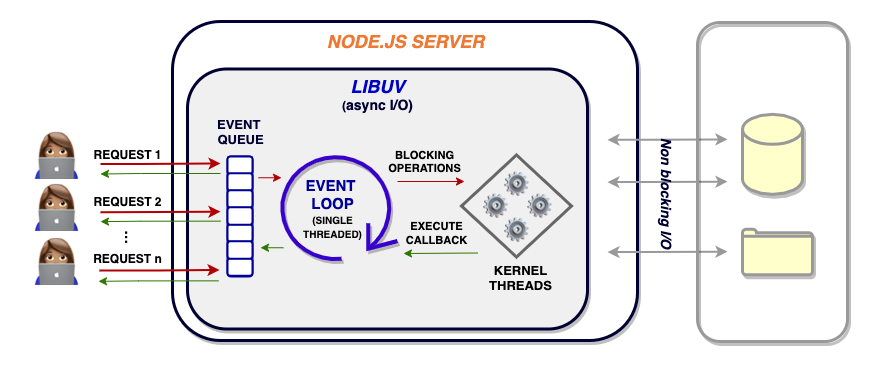
The event loop can take care of basic processing itself, but for async I/O operations, involving modules such as fs (I/O-heavy) and crypto (CPU-heavy), it can offload the processing to the worker pool in the system kernel. The worker pool is implemented in libuv and can spawn and manage multiple threads as per the requirement. These threads can individually run their respective assigned tasks in a synchronous manner and return their response to the event loop whenever ready. While these threads work on their assigned operations, the event loop can continue operating as usual, concurrently catering to other requests. When the threads are done with their tasks, they can return their output to the event loop, which can then place this back on the execution queue to be executed or returned back to the client.
The thought process behind adopting such an architecture can be attributed to the fact that under typical web loads, a single main thread can perform and scale much better as compared to conventional “one thread per request” architectures. As a result, Node.js is the go-to option for many because of it’s advantages in terms of speed and scalability. The caveat here however, is that performance can suffer for upfront complex, memory intensive operations like matrix multiplications for image processing, data science and machine learning applications. These can block the one and only main thread, making the server unresponsive. However, for such cases, Node.js has also introduced worker threads which developers can leverage to create efficient multi-threaded Node.js applications.
If you are interested in learning more about writing asynchronous code in Javascript, you can check out the Asynchronous Javascript: From Promises to Async/Await post on our blog.
Why A Good Setup Matters for Node.js Apps 🏠
Now that we have a clear understanding of the mechanics of how Node.js works under the hood, let’s segue into the more applied side of things and look at what constitutes an intelligent Node.js project.
A good project structure setup is the key to any software engineering pipeline and lays a solid foundation for an effective application. When starting out with a new Node.js project, a well-defined structure laid out beforehand provides a clear bird’s eye view of your system’s working. It also helps you organize your business logic, services, API routes, data models, etc. in a systematic fashion. This elicits coherence and clarity about the role and place of various components in your project.
A sound structure allows you to break down and simplify a complex system into smaller, more intelligible modules that draw a better picture of how your application works internally. The following are the key points that an ideal project setup entails -
- Coherent, well-defined structure for clarity
- Reusability, modularity, and separation of concerns
- Simplicity for better understanding
- Easy debugging and maintenance
- Automated testing, logging mechanisms
- Employing best programming, development principles
To establish a set of ground rules and guidelines to consider when building Node.js applications, let us dive into the next section where we discuss the best practices for development in Node.js projects.
Best Practices for Node.js Development ✅
The internet is full of tutorials, documentation, blogs and videos covering the basics of web development. But usually, information (and importance) about best practices is something that we learn along the way, as we build more apps, as we fail and succeed along the way.
In this section, I want to distill the most important aspects of web development into a set of bullet points to always consider when building web applications with Node.js. These points bring forth insights about how certain design decisions can pay a huge dividend in the course of your web development lifecycle.
Best Practice #1: Take a Layered Approach 🧁 🌈
Separate your concerns.
Popular Node.js frameworks like Express.js allow you to define route handlers as callback functions that are executed when a client request is received. With the amount of flexibility that these frameworks provide, it might be naively tempting to define all your business logic directly inside those functions. If you start on this path, you’ll notice that things can quickly escalate and before you know it, your petite server routes file can turn into a clunky, unwieldy and messy blob of code that is not only difficult to read, maintain and manage, but also difficult to unit test.
This would, therefore, be a good place to implement the renowned ‘separation of concerns’ programming principle. According to this, we should have different modules for addressing different concerns pertinent to our application. As far as server-side apps are concerned, different modules (or layers) should take the responsibility of catering to different aspects of processing a response for a client request. Broadly, in most cases, this is likely to unfold as -
Client request ➡️ Some business logic + some data(base) manipulation ➡️ Returning the response
These aspects can be handled by programming three different layers as shown below -

- Controller
- (API routes and endpoints)
- Service layer
- Data access layer
- (for working with a database)
Controller layer 🎮
This is the module of your code where the API routes are defined. Here you define only, and only your API routes. In the route handler functions, you can deconstruct the request object, pick the important data pieces and pass them to the service layer for processing.
Service layer 👩🏽🏭 🏭
This is where your business logic lives, even the secret sauce of your application. It contains a bunch of classes and methods that take up singular responsibility and are reusable (and also follow other S.O.L.I.D programming principles). This layer allows you to effectively decouple the processing logic from where the routes are defined.
One more aspect to consider here is the database part. To independently deal with this, we need one more layer.
Data Access Layer 🌐
The Data Access layer can take up the responsibility of talking to the database - fetching from, writing to, and updating it. All your SQL queries, database connections, models, ORM (object-relational mappers), etc. are supposed to be defined here.
This three-layer setup serves as a reliable scaffolding for most Node.js applications, making your applications easier to code, maintain, debug and test. Now let’s look at how we can actually implement these layers in our project.
Best Practice #2: Folder structure 🗂
Properly organize your code files.
In the previous section, we looked at how we can logically modularize our project into three separate layers. This abstract architecture can be realized through a proper folder structure that separates different modules into different folders.
This provides clarity about which functionality is managed where, and allows us to organize our classes and methods into separate containers that are easier to manage. Below is a common (yet effective) folder structure that can be used as a template when setting up a new Node.js project.
   src
      ├── app.js			app entry point
      ├── /api			controller layer: api routes
      ├── /config			config settings, env variables
      ├── /services		service layer: business logic
      ├── /models			data access layer: database models
      ├── /scripts		miscellaneous NPM scripts
      ├── /subscribers		async event handlers
      └── /test               test suites
Here, the directories - /API (controller layer), /services, and /models (data access layers) represent the three layers we discussed in the previous section. The /scripts directory can be used to store workflow automation scripts for building (eg. deployment) pipelines and the /test directory is used for storing test cases. We will look at the purpose of /config and /subscriber directories later in the post when we talk about configuration files, environment variables, and pub/sub-models.
As a developer, nothing brings me more pleasure than reading (and writing) cleanly structured and organized code. This can lead us to the next important development practice to keep in mind - clean code and easy readability.
Best Practice #3: Publisher Subscriber Models 📡
The Publisher/Subscriber model is a popular data exchange pattern in which there are two communicating entities - publishers and subscribers. Publishers (message senders) send out messages along specific channels without any knowledge of the receiving entities. Subscribers (message receivers), on the other hand express interest in one or more of these channels without any knowledge about publishing entities.
It’s a good idea to incorporate such a model in your project to manage multiple children operations corresponding to a single action. For example, your app, when creating a new user upon signup, will be doing a bunch of things - creating a user entry for the database, generating an authorization key, sending a confirmation email and much more. If all of this is handled by one service function in your, not only will it grow lengthier than usual, but will also violate the principle of Single Responsibility. Here is a sample code for the same-
export default class UserService() {
async function signup(user) {
}
}
Let’s see how we can simplify and modularize this efficiently using the pub/sub model.
The pub/sub pattern can be set up in Node.js using the Events API. In the above example, you could program your code to first emit a ‘signup’ event when the request is received. In this case, your service module needs to make only one call to emit the respective event, as opposed to the multiple function calls in non pub/subsetting.
var events = require('events');
var eventEmitter = new events.EventEmitter();
export default class UserService() {
async function signup(user) {
eventEmitter.emit('signup', user.data)
}
}
To handle such events emissions, you can have multiple subscribers that are essentially event listeners, waiting for certain events to be emitted. These subscribers can be organized into separate files based on their purpose and stored in the /subscribers directory that we saw in the folder structure section of this post. Now let’s create sample subscriber files for our example above -
eventEmitter.on('signup', async ({ data }) => {
})
eventEmitter.on('signup', async ({ data }) => {
})
As you can see, this approach is cleaner, more flexible and therefore better for maintenance and scalability.
Best Practice #4: Clean Code & Easy Readability 👓
Use code linters, formatters and style guides; add comments.
Linting & Formatting 🔍
The main goal here is to improve code quality and make it easy to read. Most code setup workflows always contain a code linter and formatter. A linter looks for and warns about syntactically (and even semantically) erroneous code whereas a code formatter (as the name suggests) works towards the more stylistic aspects of your code to ensure a set of formatting and styling guidelines consistent across your whole project. Some of the most popular linters for Javascript are ESLint, JSLint and JSHint. For code formatting, you can look at Prettier. The good thing here is that most IDEs/code editors like Visual Studio Code (VSCode), Atom, etc understand the importance of writing quality code and provide linting and formatting plugins that are super intuitive and extremely easy to set up.
These IDEs also provide useful features like intelligent code completion, auto imports, on-hover documentation support, debugging tools, code navigation, refactorings and so much more. So I highly recommend getting one of such IDEs (preferably VSCode) set up for your coding workflows.
Style Guides 🧣
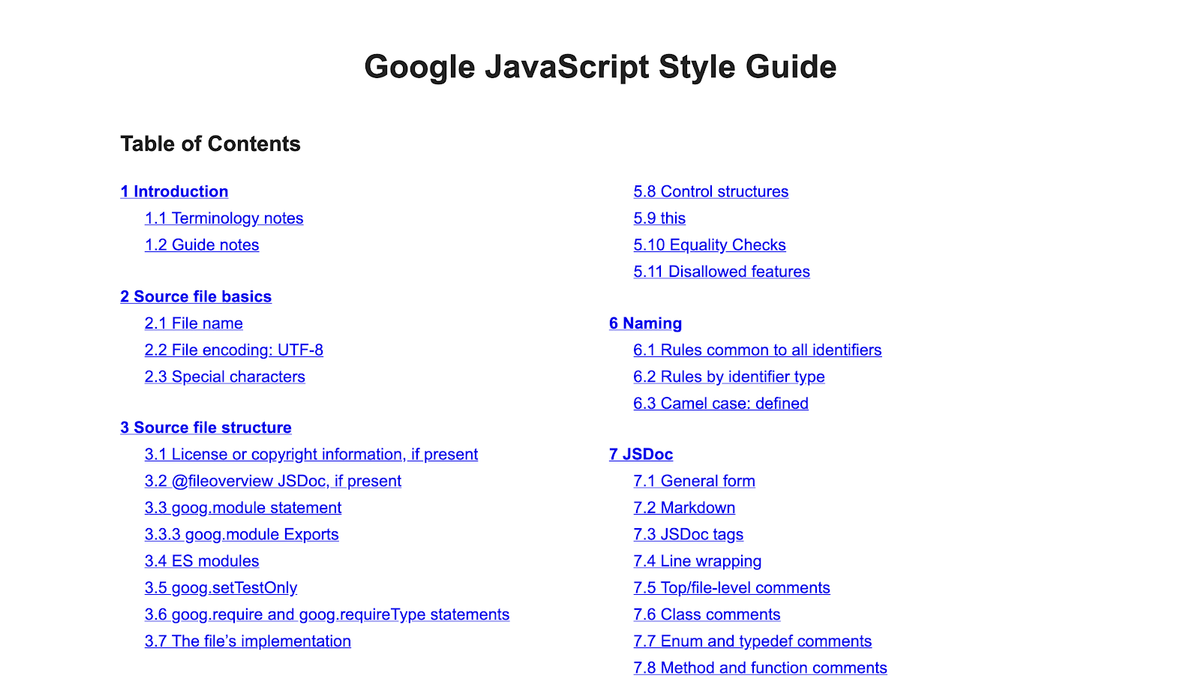
Apart from linting and formatting, you can also refer to Javascript coding style and standards used by giants like Google and Airbnb. These guides cover everything from naming conventions (for files, variables, classes, etc) to formatting specifics to file encodings and so much more. This can help you write quality code that conforms to practices and standards used by some of the top developers in the world.
Add comments 💬
When writing code, another important thing to be diligent about is adding helpful comments that other developers on your team can benefit from. All it takes is just a five to six-word sentence to nudge your teammate in the right direction towards understanding the purpose of even the most complex of code snippets. This saves everyone a lot of time and confusion and is therefore always a win-win situation.
One thing to note here is that we’ve also got to be intelligent with our comments i.e neither comment too much, nor too less. Worried about finding the balance? In the words of Michael Gary Scott, “You’ll learn baby. You’ll learn!”.
Comments also serve as a way to document your project’s API (for a top-level overview, copyright notice, author information etc), it’s classes (description, parameters), methods and named functions (description, parameters, return type etc). This can also be done using API documentation generator tools like JSDoc.
Best Practice #5: Write Asynchronous Code 🤝
Use promises, async/await syntax.
Javascript is quite known for its callback functions (functions that can be passed as an argument to other functions). They also allow you to define asynchronous behavior in Javascript. The problem with callbacks is that - as your number of chained operations increase, your code gets clunkier and unwieldy, resulting in what is infamously known as callback hell. To solve this, ES 6 (ECMASCRIPT 2015) came out with the Promises API that made it much easier to write asynchronous code in Javascript. On top of this, with ES 8 (2017), the async/await syntax was introduced to further simplify things and make the API even more intuitive and natural.
Therefore, it is advocated to ditch clunky callback functions in favor of async/await and promises based syntax in your Node.js application. This allows for cleaner code, better readability, easier error handling and testing; all of this while maintaining a clear control flow and a more coherent functional programming setup.
Just to give you a sense of how much easier your life can be with async/await, here is a comparison between both ways of writing asynchronous code.
<script>
    function get_data() {
        $.get('https://url.com/one', () => {
            $.get('https://url.com/two', () => {
                $.get('https://url.com/three', (res) => {
                    console.log(res)
                })
            })
        })
    }
</script>
Callback function example code
<script>
async function get_data() {
await $.get('https://url.com/one')
await $.get('https://url.com/two')
let res = await $.get('https://url.com/three')
console.log(res)
}
</script>
Async/await example code
As mentioned before, we have covered everything about asynchronous programming in Javascript in a post on our blog. If interested, you can check it out here -> Asynchronous Javascript: From Promises to Async/Await.
Best Practice #6: Configuration files and Environment Variables 🌳
Config it up!
As your app scales, you’ll notice the requirement of certain global configuration options and settings to be accessible across all modules. It is always a good practice to store these options together in a separate file inside a config folder in your project. We looked at this folder previously in the folder structure section of this post. This folder can contain all your different configuration options grouped in files based on their usage.
/config
        ├── index.js
        ├── module1.js
        └── module2.js
Config folder example
These configuration options can contain either common, basic settings or secure API keys, database connection URLs etc. The latter are supposed to be stored in .env files as environment variables. This is how a .env file stores data in the form of key-value pairs -
DB_HOST=localhost
DB_USER=root
DB_PASS=my_password_123
Example .env file
These .env files are secret files that are not to be (Git) tracked and are therefore not committed or pushed (except for the first time with empty values).
These environment variables can be accessed in your code using npm’s dotenv package as shown below -
require('dotenv').config()
console.log(process.env.DB_HOST)
console.log(process.env.DB_USER)
Accessing environment variables in your code
A very common development practice is to import all these variables (along with other predefined options and settings) in your config files and expose them as an object to the rest of your application. This way, if required, you only need to make changes to a common setting in one place and that will reflect across your whole application. Here is a snippet showing how this can be done -
require('dotenv').config()
export default {
host: process.env.DB_HOST,
user: process.env.DB_USER,
pass: process.env.DB_PASS,
}
Exporting config object with env variables
This way you don’t need bulky process.env.key_name calls in your code, and is therefore cleaner. Moving on!
Best Practice #7: Testing, Logging & Error Handling 🕵🏻♂️
Errors are an important part of the process.
Test your code 🔬
For people starting out in software development, it is quite common to overlook the importance of writing test cases for your code. However, testing is integral to any software application - it allows you to test the validity, accuracy, and robustness of your code by bringing to light even the smallest inaccuracies - not only in the collective system but even in its atomic constituents in isolation. Testing allows all of this and more, in a conveniently automated fashion.
Unit tests form the foundation of most testing setups. Here, individual units/components are tested in isolation from the rest of the code to verify their correctness. This allows your code to be validated at the (logically) lower level to ensure that each of the internal components is working accurately, as expected. Below is an example of an extremely basic unit test -
const assert = require('assert');
describe('Basic addition test', () => {
it('should add up to 3', () => {
assert.equal(2 + 1, 3);
});
it('should equal 8', () => {
assert.equal(4 * 2, 8);
});
});
OUTPUT:

These test cases check whether unit components of your code are returning expected outputs or not. For developing these test suites, there are plenty of testing frameworks out there for Node.js developers to choose from. Some of the most popular ones are Mocha, Jest and Jasmine.
Log ‘em all 📝
Logging plays an important role throughout the whole pipeline of any software application: from development to testing to releasing for production, a well-implemented logging system allows you to record important information, and understand the various aspects of your application’s accuracy and performance metrics. It not only allows you to be able to understand and manage your application better but also makes debugging a whole lot easier.
Javascript provides a bunch of functions for printing and logging information. For logging general information and debugging, you can use -
- console.log()
- console.info()
- console.debug()
For logging errors and warnings ⚠️ -
- console.error()
- console.warn()
It also allows you to pipe your log messages either to the console or to a file stream (using the ‘ > ’ operator). However, if you are looking for more functionality and convenience for your logging setup, you can consider using third party logging libraries into your code. Some of the most common logging frameworks for Node.js are - Winston, Bunyan, and Morgan.
If you’re interested in learning more about logging in Node.js, you can check out the Node.js Logging: A How-to Guide post on our blog, where we talk about this in great detail.
Catching Errors ⚠️
The counterintuitive truth is that errors are good, for developers. They allow them to understand the inaccuracies and vulnerabilities in their code by alerting them when their code breaks. They also provide relevant information about what went wrong, where, and what needs to be done to make amends.
But instead of letting Node.js throw errors, interrupt code execution, even fail at times, we’d rather take charge of our application’s control flow by handling these error conditions. This is what we can achieve through exception handling using try/catch blocks. By empowering developers to programmatically manage such exceptions, it keeps things stable, facilitates easier debugging, and also prevents a poor end-user experience. Below is a basic try/catch block example in Node.js.
try {
if (xyzHappens) {
throw "my error message ⚠️";
}
}
catch (e) {
console.log(e);
}
finally {
console.log("Finally executed! 🏁");
}
Node.js exception handling example
Best Practice #8: Code Compression and File Size 📦
Gzip compress!
Gzip is a lossless file format (also a software application) used for compressing (and decompressing) files for faster network transfer. It can therefore be extremely beneficial in compressing the web pages being served by our Node.js servers.
Frameworks like Express.js make setting up Gzip compression unbelievably easy using the compression middleware. Using Gzip compression is also the number one tip that the Express.js documentation recommends for improving application performance. Take a look at what the code for this looks like -
  var compression = require('compression')
  var express = require('express')
  var app = express()
  app.use(compression())
Enabling gzip compression in Express.js
This essentially compresses the response body returned by the server for each request, resulting in reduced latency and much faster websites.
While you’re working on optimizing performance on the server side, it is also important to keep a check on your frontend code - to be aware of the sizes of the web pages being served. You should, therefore, make sure to minify your frontend HTML, CSS, Javascript code using tools like HTMLMinifier, CSSNano and UglifyJS before serving. These minifiers remove unnecessary whitespaces and comments from your files and also make some trivial compiler optimizations, overall resulting in reduced file size.
Therefore, using Gzip compression along with a minified frontend code is the way to go!
Best Practice #9: Dependency Injection 💉
Dependency injection is a software design pattern that advocates passing (injecting) dependencies (or services) as parameters to our modules instead of requiring or creating specific ones inside them.
This is a really fancy term for a very basic concept that keeps your modules more flexible, independent, reusable, scalable and easily testable across your application. Let’s look at some code to see what this really means.
Here is a module in our code that exposes two functions for dealing with an arbitrary Emoji class. It also uses a yellow-emojis module that can be assumed to deal with a data bank of yellow emojis.
const Emoji = require('./Emoji');
const YellowEmojis = require('./yellow-emojis');
async function getAllEmojis() {
return YellowEmojis.getAll();
}
async function addEmoji(emojiData) {
const emoji = new Emoji(emojiData);
return YellowEmojis.addEmoji(emoji);
}
module.exports = {
getAllEmojis,
addEmoji
}
The problem with this setup is that it is closely tied to cater to one specific set of emojis (yellow ones). As a result, if you wanted to change your code to be able to work with a different set of emojis (or multiple sets), you would have to create separate functions or overhaul your current setup.
Therefore, a much better approach would be to create functions that don’t rely on one way of doing things, and are more generic and flexible. Let’s see how this can be done by injecting a dependency into our module -
 const Emoji = require('./Emoji');

            function EmojisService(emojiColor) {

                async function getAllEmojis() {
                    return emojiColor.getAll();
                }

                async function addEmoji(emojiData) {
                    const emoji = new Emoji(emojiData);

                    return emojiColor.addEmoji(emoji);
                }

                return {
                    getAllEmojis,
                    addEmoji
                };

            }

            module.exports = EmojisService
With dependency injection
Here, we create a new function (EmojisService) for our service that takes our dependency (emojiColor) as a parameter instead of being fixated on dealing with just one color type (yellow). This is what we mean by dependency injection. Thanks to this, our service is more of a generic interface that is not only easy to reuse but also easier to unit test. This is because in the previous case, we’d have to create a stub yellow-emojis to test the module. Whereas now we can directly pass our emojiColor dependency to the test case.
Best Practice #10: Third-party solutions
Don’t reinvent the wheel. Don’t be greedy either.
Node.js has a huge developer community across the world. As far as third-party support is concerned, Node’s package manager, NPM is full of feature-rich, well maintained, well documented, frameworks, libraries and tools for any use case you can imagine. It is therefore very convenient for developers to plug these existing solutions into their code and make the most of their APIs.
As a developer, it helps to be on the lookout for tools that make your life easier. Here are some popular Node.js libraries that can effectively enhance your coding workflows -
- Nodemon, (automatically restarts application when code files are updated)
- Gulp, Grunt, (automated task runners)
- Winston, (logging framework)
- Agenda (job scheduling),
- Moment (working with date & time)
While these libraries and tools ease off a lot of the burden, it is important to be intelligent and responsible about every package that we import. We should be aware about the purpose, strengths and weaknesses of each package we import and ensure that we aren’t over-reliant on them.
Best Practice #11: Follow good generic coding practices
“ Always code as if the guy who ends up maintaining your code will be a violent psychopath who knows where you live.” - Martin Golding
- DRY (Don’t Repeat Yourself)
- Single Responsibility Principle (SRP)
- “Keep it simple, stupid” (KISS)
- Separation of Concerns
- YAGNI (You ain’t gonna need it)
- Avoid premature optimization
- S.O.L.I.D programming principles
- Dependency injection
You can read more about each of these on the internet and check which of these you have been following so far.
Best Practice #12: Use Application Monitoring Tools
For large-scale applications in production, one of the main goals is to better understand how users interact with the application: about which routes or features are most commonly used, about the most commonly performed operations, etc. Also, there is a focus on evaluating performance metrics, quality issues, bottlenecks, common errors, etc. and using that information to make the necessary changes and improvements.
This is where application monitoring (APM) tools like ScoutAPM come into the picture. ScoutAPM allows you to constructively analyze and optimize your web app’s performance.
It gives you real-time insight so you can quickly pinpoint & resolve issues before the customer ever sees them.
Scout is the only Node.js Application Performance Monitoring (APM) product that pinpoints and prioritizes performance and stability issues like N+1 database queries, slow database queries, performance abnormalities, and more in Node.js applications.
Conclusion
Ready to Start Your Node.js Project?
Alright then! That’s it for this post. Even though there are many more aspects to intelligent web development, I have tried to present the most important themes to consider when building Node.js applications.
In this post, we first looked at the internals of Node.js architecture - we learned about its single-threaded architecture and it’s event loop mechanism for running asynchronous code. We then transitioned into understanding the various aspects of what it takes to build a robust, sustainable, and scalable Node.js application. We looked at 12 best practices that covered everything from how you can logically structure your project to an overview of logging, testing, formatting, linting to the nitty-gritty of writing asynchronous code and so much more.
Now that you know everything about building solid, bulletproof Node.js applications, go ahead and implement everything you’ve learned today into your existing projects or create one from scratch, and share them with the world. Good luck!
Stay healthy, stay safe, and keep learning.
Until next time! Happy coding!


