In this post I am going to explain How to optimise your website images using NodeJs. If you have any online E-Store or you ever worked on any eCommerce website you know that product image is very important to let customers know about your product and convince the customer to buy that product. But if your product image are not optimised first it will take long time to load and your user leave and also if the quality of the image is not good enough then also customer not going to buy your product, so here we have to keep both things in our mind optimise image to load fast and also keep its quality high so user can easily understand and like your product. There are lots of tools like Cloudinary, TinyPng etc. which can also optimise your image. But if you need your own system then this post is for you.
Optimise image using NodeJs Imagemin plugin
Before we start creating our node application I hope you have good knowledge of NodeJs, NPM and Grunt. If you haven’t use Grunt please check out Grunt get started guide. Now follow bellow simple steps to create a simple application.
Step 1: Create your project directory name it whatever you want . In my case I name it ImageProcess.
Step 2: Now create two files inside your ImageProcess first file package.json and second is gruntfile.js.
Step 3: Open package.json file and paste bellow code inside it.
1
2
3
4
5
6
7
8
9
10
11
12
{
"name":"ImageProcess",
"version":"0.1.0",
"devDependencies":{
"grunt":"^0.4.5",
"grunt-contrib-jshint":"^0.10.0",
"grunt-contrib-nodeunit":"~0.4.1",
"grunt-contrib-uglify":"~0.5.0",
"grunt-newer":"^1.3.0",
"imagemin-mozjpeg":"^5.1.0"
}
}
After this, we also need to install Grunt CLI tool and other dependencies, open terminal inside ImageProcess and run below command
1
npm install-ggrunt-cli
Now we can install imagemin plugin to install run below command
1
npm install grunt-contrib-imagemin--save-dev
Now open gruntfile.js and paste, bellow code in it.
1
2
3
4
5
6
7
8
9
10
11
12
13
14
15
16
17
18
19
20
21
22
23
24
25
26
27
28
29
30
31
32
33
34
35
36
varmozjpeg=require('imagemin-mozjpeg');
module.exports=function(grunt){
// Project configuration.
grunt.initConfig({
pkg:grunt.file.readJSON('package.json'),
imagemin:{// Task
dynamic:{// Another target
options:{// Target options
optimizationLevel:2,
svgoPlugins:[{removeViewBox:false}],
use:[mozjpeg()],
progressive:true,
cache:false
},
files:[{
expand:true,// Enable dynamic expansion
cwd:'src/',// Src matches are relative to this path
src:['**/*.{png,jpg,gif}','!dist/**'],// Actual patterns to match
dest:'dist/'// Destination path prefix
}]
}
}
});
// Load the plugin that provides the "uglify" task.
//grunt.loadNpmTasks('grunt-contrib-uglify');
grunt.loadNpmTasks('grunt-contrib-imagemin');
grunt.loadNpmTasks('grunt-newer');
// Default task(s).
grunt.registerTask('default',['imagemin']);
};
After paste creates two new folders inside project src and dist. Add some images inside your src folder which we can optimise and save it into dist folder. Now run bellow command to optimise your images.
1
grunt imagemin
After running above command you get output like shown in bellow image, which shows how much memory you save
With the help of above code you can optimise your image without losing its quality and the reduce load time of your speed. Hope this post help you. If this post helps you please like and share trinitytuts .
Please like our page!
Please support us, use one of the buttons below to continue download.
Images are everywhere across the internet. You would be hard pressed to find a single page or application that doesn’t contain at least one image in some form or another. Images are great way to help tell stories and emphasize critical parts of our lives.
But if you’re like me you know that having a large image can seriously impact the performance of your site/app. So today, I’m going to teach you how to use Gulp and an npm package called gulp-imagemin to reduce the size of your images on the fly.
If you don’t know what all of these words mean, fear not! I have some relevant and important links/descriptions below to help bring you up to speed.
Minification, or minifying as I like to call it, is the act or process of removing unnecessary parts of source code to reduce size.
Gulp is a JavaScript build tool that allows you to automate parts of your workflow to streamline your process. It takes care of some not so interesting, but important, aspects of your workflow (like reducing image size) so that you can focus on the building. You can find Gulp here.
To make use of npm we'll need to install Node.js which is, in a nutshell, the framework that allows developers to use JavaScript code in a server (back end) environment. You can find Node here.
npm (Node Package Manager) is and does what its name implies. It is a package manager for JavaScript and "the world's largest software registry". Just think of npm as a giant storage area for awesome packages/utilities to help developers. You can find npm here.
gulp-imagemin is one of those awesome packages I mentioned earlier. Using this package we'll be able to automatically reduce the size of our images every time a save occurs. You can find gulp-imagemin here.
Alright, now that explanations are out of the way let’s get to the fun parts :D
Project File Structure
Start by opening up your text editor of choice and creating a directory for your project or if you have an existing directory navigate to that directory in your terminal and skip down to the Installing Node & npm Section.
Here’s how my project structure looks in my terminal:
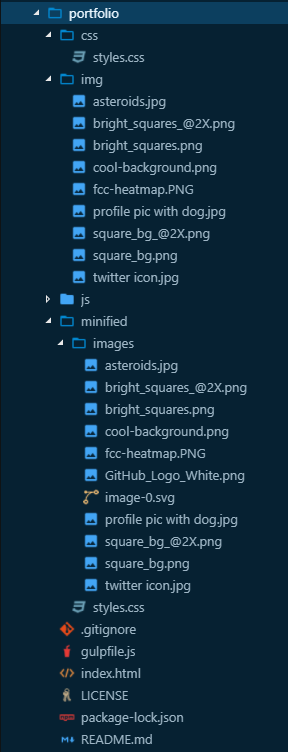
And here’s how my project file structure looks in the explorer inside VS Code:
As you can see I have a separate directory for my base files and the minified files. Once you have your project directory established it’s time to start installing everything we’ll need.
Installing Node & npm
Alright, now that our directory is up and running let’s start installing our dependencies. If you already have Node & npm installed, feel free to skip down to the Installing Gulp & gulp-imagemin Section.
First, enter node --v within your terminal to check and see if you have the Node installed. If you do, you'll get something back like v8.9.3
If you get nothing back or an error, simply download and install Node from here. It could take a few minutes so +be patient.
Once Node.js is installed, you'll have npm installed as well because it comes bundled with Node. You can check the version of npm by typing npm -v in your terminal. You should get something like 6.4.1back.
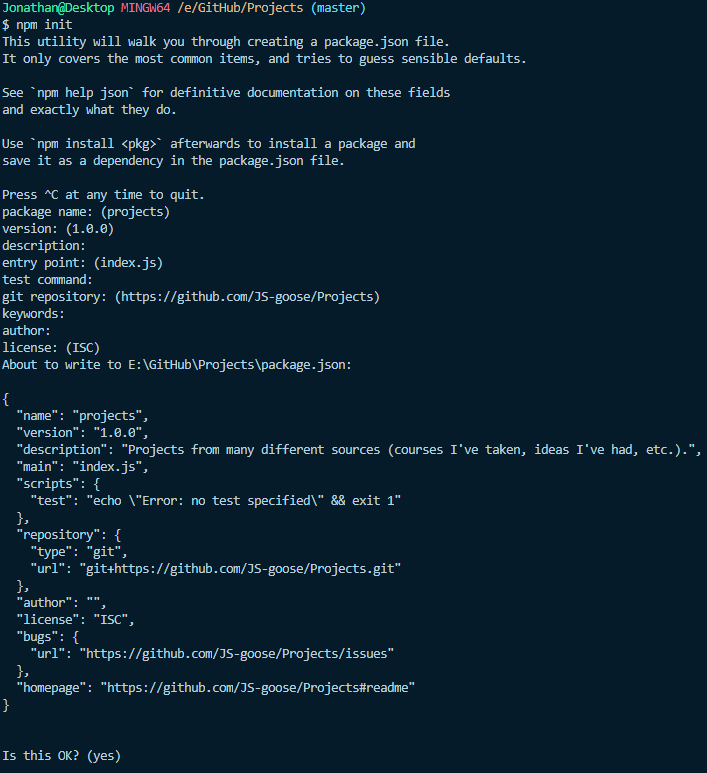
Next we need to create a package.json file for our project. We do this by using the command npm init (find out more about package.json here). You'll be asked a series of questions but if you don't want to answer them you don't have to, just hit enter until you see Is this OK? (yes), then hit Enter one last time and you'll be finished with this section.
You’ll notice that this file was created in a different directory than the one I started with. This is so I can provide an example, as I have previously installed all of this in my current project directory.
Installing Gulp & gulp-imagemin
Once Node & npm have been installed, we can now install Gulp & gulp-imagemin by following these steps:
First, type npm install --save-dev gulp in your terminal. If you want to know what the --save-dev flag does, check out this Stack Overflow post.
Again, be patient as installing Gulp might take a minute but you’ll eventually end up with something like this: gulp@4.0.0 added 318 packages from 218 contributors and audited 6376 packages in 49.362s found 0 vulnerabilities
You can check your Gulp version by typing gulp -v in your terminal and you'll get something similar to this: [13:06:56] CLI version 2.0.1 [13:06:56] Local version 4.0.0
Now let’s install gulp-imagemin by typing npm install --save-dev gulp-imagemin and again you'll get something like this back: gulp-imagemin@5.0.3added 232 packages from 97 contributors and audited 10669 packages in 39.103s found 0 vulnerabilities
And the final step for this section is to create our gulpfile.jsIt is very important that your file has this exact name and is in the outer most level of your project folder structure!
Writing the Code — Finally the Fun!
Ok, now that we’ve taken care of installing everything in the correct place, let’s open up our gulpfile.js and write the actual code that will do all of the hard work.
Start by requiring gulp --> const gulp = require('gulp');We're basically taking advantage of Node's module system to use code that is located in different files
Now require gulp-imagemin --> const imagemin = require('gulp-imagemin'); Again we're taking advantage of the module system to use this code in our project
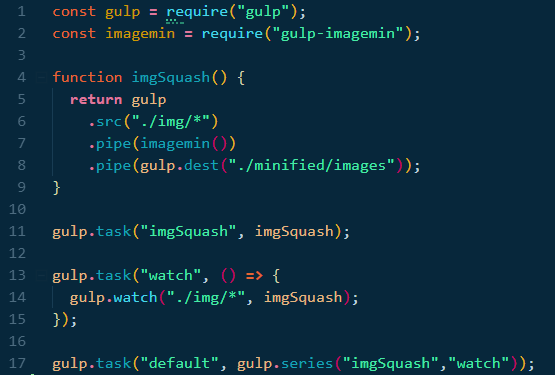
Now, we need to write the function that will do all of the image squashing: function imgSquash() { return gulp .src("./img/*") .pipe(imagemin()) .pipe(gulp.dest("./minified/images")); }
If you set your directory up following mine, the code above will work. If your directory looks different you will need to change the .src & .dest lines to match where your files are located and where you want them piped to after they've been minified.
Gulp operates based off of tasks and we can give it plenty of those to keep it busy. Once we've defined the actual function to do the heavy lifting, we need to tell Gulp what to do with that function: gulp.task("imgSquash", imgSquash);
Now, we want Gulp to watch our given directory for changes (new images) and when it detects those, we want it to automatically run our imgSquash function, minify our images, and pipe them to the destination we set. We achieve that by defining another task to watch the directory: gulp.task("watch", () => { gulp.watch("./img/*", imgSquash); });
The last step to writing the code is defining the last task to call our imgSquashand watch tasks in succession:gulp.task("default",gulp.series("imgSquash","watch")); Here the word "default" refers to the word gulp in the terminal and the gulp.series will ensure that the imgSquash function runs and immediately after Gulp will watch the directory for changes.
Here is what our finished file should look like:
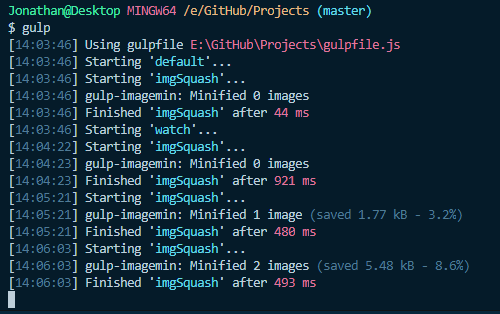
Save this file, open your terminal, and type gulp and hit enter. You should see something like this:
As you can see, each time a new file was added to the base directory, our tasks kicked in because Gulp was watching and immediately ran our imgSquash function to minify our images. When you're finished using Gulp you can hit ctrl + c in your terminal to terminate the watch process.
Now you can start using your minified images on your website/app and enjoy that new found boost in performance!
Wrap Up
Gulp is a very powerful JavaScript build tool that can help automate some of the more tedious, but important, aspects of building your project. With less than an hour’s worth of work you were able to get your images minified, thus reducing load time and increasing performance for your website/app. That’s awesome and you should be proud of yourself!
This is just one of the many ways that build tools like Gulp can help you. There are many more ways it can help (minifying/concatenating CSS/JS files) and I hope you explore some of those awesome options.
If you enjoyed this article please consider donating some claps as it helps others find my work. Also, drop a comment and let me know what you’re working on and how Gulp helps you focus on the building.
And finally, this article was originally posted on my personal blog. While you’re there don’t forget to sign up for the Newsletter which can be found at the top right corner of my blog page. I send it out monthly (I promise not to spam your inbox) and it’s filled with awesome articles from across the web that I think you’ll find helpful.
As always, have an awesome day full of love, happiness, and coding!
 . In my case I name it ImageProcess.